Showing posts with label Corned Powder. Show all posts

Sunday, December 4, 2016

Black Powder - Chemical Examination

In our last few posts, we saw how people would determine the quality of black powder by measuring the physical properties of the powder, such as color, size, shape, density, hygroscopic properties etc. In today's post, we will study some of the chemical properties that people would examine to determine the quality of powder.

The first type of test was the Qualitative Examination test, which was done if the ingredients of the powder were not known (e.g. some powders did not have sulfur, others may have sodium nitrate instead of potassium nitrate, still others may have charcoal made of wood, wood pulp, bark, straw etc.).

Recall a few months ago, we had stated that black powder is a mixture and not a compound at room temperature. It only forms various chemical compounds when it starts to burn. Therefore, since it is a mixture, it retains properties of its component parts.

Therefore, to determine the kind of nitrate contained in the powder, a small quantity of powder would be put in a filter and then hot water poured over it, which dissolves the nitrate salt. The filtered liquid was then chemically analyzed to determine the type of nitrate. Next, to determine if the powder contains sulfur or not, a small quantity was placed in a beaker and carbon disulfide was poured on top and allowed to stand for a little while. The solution was then poured out and evaporated. If any sulfur was present in the powder sample, it would crystallize out. To determine the type of charcoal used, they would first remove the sulfur from the sample using the carbon disulfide solution, then they would filter it and then wash with hot water to extract the saltpeter out, then they would dry out the remaining residue and examine it under a microscope, which would show whether the carbon was made from charcoal, wood pulp, wood bark, straw etc.

Of course, the above qualitative tests would show the presence of the ingredients in the powder, but not the proportions of the ingredients. To do that, they would do quantitative analysis tests, which determine the percentages of the ingredients. To do this, they would first dry a sample of powder as much as possible. Then, they would take a known quantity of powder, run hot water through it several times to dissolve all the saltpeter and then evaporate the solution to recover the saltpeter crystals, which could then be weighed.

After the saltpeter had been removed from the sample of powder, the next was to determine the amount of sulfur in the remaining sample. This could be done either directly, or by converting the sulfur into sulfuric acid. The direct method was due to Berzilius: The sample of powder after the saltpeter was extracted, was dried and weighed and then transferred into one of the bulbs of a double bulbed tube. A current of dry hydrogen was passed over the mixture while it was gradually heated. This heat would cause the sulfur to vaporize and the sulfur fumes would be carried along with the current of hydrogen into the second bulb, where it would cool down and crystallize in the second bulb. The decrease in weight in the first bulb and the increase in weight in the second bulb could be measured and this would show the amount of sulfur in the sample. Another technique was to dissolve the sulfur in a carbon disulfide solution and then evaporate it to recover the sulfur crystals, which could then be weighed to determine the percentage of sulfur in the sample.

After the saltpeter and sulfur have been removed, the remainder was dried and weighed to determine the amount of carbon in the sample.

It is also possible to determine all the components of black powder simultaneously, using special apparatus, such as that invented by Linck in the 19th century.


Click on the images to enlarge. Public domain images.


This involves using various pieces of equipment to precisely extract the components of the powder, using carbon disulfide, hot water, barium chloride, lead acetate etc. to determine the exact quantities of the various ingredients in the sample.


Friday, November 25, 2016

Examining Black Powder Quality - III

In our last post, we studied one physical property (density) that was used by people to judge black powder quality. Today we will study another technique that people used to judge the quality of black powder: the hygroscopic properties of powder.

The term "hygroscopy" refers to the phenomenon of certain substances attracting water molecules from the surrounding air and absorbing it. Examples include table salt, sugar, honey etc. This is why they are usually kept in sealed containers, otherwise they tend to absorb water from the atmosphere and spoil.

In the case of black powder, two of its three components have hygroscopic properties: saltpeter and charcoal. The saltpeter is usually hygroscopic due to the presence of impurities such as calcium salts and sodium chloride. In general, calcium sulfates or calcium oxide can react with the sodium chloride to form calcium chloride, which is very hygroscopic in nature. The calcium chloride on the surface absorbs enough water to become a liquid and dissolves some saltpeter and the solution spreads itself through all the grains by capillary action. This causes the saltpeter to be no longer evenly distributed in the powder grains. Therefore, keeping the saltpeter as pure as possible helps keep the hygroscopic properties of the powder down.

Charcoal also influences the hygroscopic properties of black powder. As a general rule of thumb, the more charcoal that the powder contains, the more water it will tend to absorb. One more interesting factor has to do with the temperature that the charcoal is manufactured at. The lower the temperature at which it was manufactured, the more water it can absorb. As a result of this, red charcoal will generally absorb more water than black charcoal.

If the powder becomes damp, it may be restored by drying in the sun or in a dry, well-ventilated room. As a general rule, if the powder does not show an efflorescence of white crystals of saltpeter on its surface, it may be possible to dry it. Powder of smaller gravimetric density will absorb more moisture than a powder of a greater one, and a glazed powder will absorb less moisture than an unglazed one, all other things being equal. Powder that has become damp can be easily recognized by its unequal distribution of color and by the grains crushing more easily between the fingers. However, if it manages to absorb a large amount of moisture. the powder will form hard black lumps and if is reaches this state, the powder is generally useless and cannot be serviced.

To determine the moisture content of a sample of powder, a standard amount (usually 100 grains or 50 grams, depending on country) would be carefully weighed onto a glass plate. Then the glass plate would be placed in an oven and heated for a few hours at a specified temperature that depended upon the country (160 °F for England, 190 °F for Germany etc.) and then placed in a dessicator to cool for 20-30 minutes, after which they would weigh the sample again. The difference in weight is the amount of water absorbed by the powder sample.

To determine the tendency of a particular powder sample to absorb moisture, the powder sample was put alongside a sample of standard powder over a layer of water in a tub, which was closed air-tight and left for a period of time. The two powder samples would then be removed and the amount of water absorbed by each sample would be compared. This test would let people know how much their particular powder differed from the standard sample powder.

In the next few posts, we will look at some of the chemical properties that people would look at to judge powder quality.

Note: I trust my American readers had a happy Thanksgiving holiday so far. Your humble editor was temporarily hospitalized for a little while, but I recovered just in time to spend the holiday at home with family and friends, just as it should be :-).

Sunday, November 6, 2016

Examining Black Powder Quality - II

In our last post, we looked at some of the physical properties (color, grain solidity, grain size etc.) that powder manufacturers would look at, while determining if the black powder was good quality or not. In today's post, we will look at some more physical properties that they would check on.

One of the properties that they would check on was the density of the black powder. Readers may recall from their physics class that density is defined as:
        density = mass / volume
(i.e.) we take a certain amount of substance, weigh it and measure its volume and determine its density that way. Different materials have different densities, so this is a quick way to determine if the  ingredients are in proper proportion with each other. This principle was famously illustrated by Archimedes, who was tasked by the King of Syracuse in Greece, with determining if his crown was of pure gold or if the goldsmith had cheated the King by mixing some other metals with the gold. Archimedes pondered on the problem and as legend has it, he was sitting in a public bath one day and saw the water overflow as he lowered his body into the tub. Then he realized he had found a solution to the problem and jumped out of the bath and ran home naked, all the while yelling "Eureka!" (Translation: "I've found it!"). He took a lump of pure gold, weighed it carefully, and then dumped it in a tub of water and measured how much volume of water was displaced, thereby finding out the density of pure gold (mass / volume). Then he took the crown, weighed it carefully, and then dumped it in water and measured the volume of water displaced and determined its density (again, mass / volume). From the difference in densities, he determined that the goldsmith had cheated the king, not only that, he could also tell how much gold the goldsmith had stolen and replaced with cheaper metal.

Similarly, measuring the density of black powder gives a good idea of the kinds of raw ingredients used, the mixture and the presence of any impurities. As far as black powder was concerned, it is a substance with grains, therefore there were three ways to measure its density:

  1. Gravimetric density - This is the density of the powder, including the air between the powder grains.
  2. Relative density - This is the density of the powder measured excluding the air between the grains, but including the air contained in the pores of the grains,
  3. Absolute or real density - This is the density of the powder, excluding all atmospheric air.
Gravimetric density is the easiest to determine. It can be measured by weighing a quantity of powder that fills a certain space. However, due to variations in grain size and quality, this method doesn't give uniform results. Variations can also occur due to the shape of the measuring vessel, the height at which the powder is dropped into the vessel, size and shape of the grains and size of the filling hole. Therefore, comparisons of different samples are only meaningful if the same kinds of powder are measured using the same apparatus.

Apparatus to measure the gravimetric density of black powder. Public domain image.

The above apparatus was used in many European countries in the 19th century. It consists of a measuring vessel (A), made of brass or copper, which is precisely calibrated to hold exactly 1 liter (1000 cubic centimeters or 61.02 cubic inches) of material. Above it is placed a funnel B, with a conical bottom and a hole of exactly 14 millimeters (55/64 inches). The height between the bottom of the funnel and the upper edge of the measuring vessel was exactly 40 millimeters (1-37/64 inches). A cut off plate, C, was placed at the bottom of the funnel, to regulate the flow of gunpowder. To determine the gravimetric density of powder, the vessel A was first emptied and weighed very accurately. Then it was placed under the funnel and powder allowed to fall into the vessel until the grains began to run off the edge of it. Then the funnel was closed and the powder was smoothed off with a brass plate and a few light blows were struck to make the powder grains settle a little, with the excess being removed with a soft brush. The vessel was then precisely weighed again. The difference between the two weighings is the weight of the powder contained in 1 liter, from which we can find the density. Since variations in grain size could affect the results somewhat, the experiment was repeated three times and the average was taken. Depending on the type of powder, different countries had different standards for densities of powder. E.g. Germany's standards were: rifle powder must be between 0.905 and 0.925, cannon powder between 0.915 and 0.935, large grained powder between 0.960 and 0.980, Austria's standard for large-grained powder had to be between .907 and .951, Switzerland had rifle powder between 0.955 and 0.975, while cannon powder was to be between 0.960 and 0.970, French standards had musket powder between 0.830 and 0.870, sporting powders at least 0.860 etc.

To measure the relative or absolute density, people generally used quite a few methods. One of them borrows the ideas of our old friend, Archimedes. They would first take a liquid that could not dissolve any of the ingredients of gunpowder. Pure distilled alcohol was often used for this purpose. They would put a certain amount of this alcohol in a glass measuring tube, calibrated in tenths of a cubic centimeter and allow it to settle for a few minutes. Then, they would accurately weigh a certain quantity of black powder and then drop it into the tube. Due to the added powder grains, the level of alcohol in the tube would rise. They would read the markings on the tube to measure the increase in volume and since they already knew the weight of the powder added, they could now determine density = mass / volume.

This method was later improved by scientists, such as Heeren, Timmerhans, Otto and others. One of the issues was that when the powder was immediately added to the tube, the level would rise at first and then drop, as air bubbles escaped from the tube due to the alcohol seeping into the air gaps between the powder grains. Therefore, the improvements were generally procedures like waiting for a certain period of time for the alcohol level to settle, heating the alcohol and using an air pump to pull out all the trapped air in the grains etc., to get a more accurate reading.

There were also dedicated instruments called densimeters, that were developed to measure the density of black powders. Examples of these include Marchand's densimeter, Hoffmann's densimeter, Bode's densimeter, Ricq's densimeter, Bianchi's densimeter etc.


Hoffmann's densimeter. Click on the image to enlarge. Public domain image.

Bode's densimeter. Click on the image to enlarge. Public domain image.


These densimeters generally used vacuum pumps and mercury to accurately measure mass and volume of the powder grains and determine the absolute or real density of the powder.

As far as black powder was concerned, both gravimetric and real densities were measured to judge its quality. Since real density measures the density of the powder without the air in between the grains, it is possible for two powders made with the same proportion of ingredients but different grain sizes, to have the same real density and different gravimetric densities. Gravimetric density, on the other hand, depends on the size and shape of the grains, on the glazing process and percentage of dust in the powder. The gravimetric density has an influence on the rapidity of combustion, whereas the real density influences both the rate of combustion of a single grain of powder and the durability (keeping quality) of the powder during transport and use. Therefore, both densities were measured to properly judge the qualities of a powder.


Saturday, October 29, 2016

Examining Black Powder Quality - I

In the last several weeks, we have taken a detailed look at the manufacturing process for black powder. In today's post, we will look at some of the procedures that were used in the 19th century to ensure black powder quality. The procedures used examined both the physical and chemical properties of black powder. In today's post. we will look at some of the physical properties that they would look for.

In places where good quality black powder was made, the powder was examined immediately after the blending process was completed. They would also periodically take small samples from powder stored in warehouses for analysis, to make sure that it was still usable.

The first thing they would do is give it a visual inspection. The color of good quality black powder should be a uniform dark gray (or slate) color. If the color has a blue tint or is very black, then this indicates that the powder has too much charcoal or contains too much moisture. Powders made of red charcoal (such as cocoa powder) should be of brownish-black color.

A sample of good quality black powder. Click on the image to enlarge.

After this, they would examine a small sample with their eyes or through a magnifying glass. Properly mixed powder should not show any difference in color even when crushed, nor should it be possible to feel sharp particles. A variety of colors indicates that the powder was not mixed evenly and the presence of sharp particles indicates that the ingredients were not pulverized properly. Bright or bluish-white spots in the powder indicate that the saltpeter has effloresced during the drying process, which will also affect the properties of the mixture.

The powder would then be allowed to run over a sheet of paper and the paper would be examined. Properly made powder should not transfer its color to the paper. If this happens, this indicates that the powder has too much moisture or dust (meal powder).

For prismatic powders, they would check to see if the prisms have smooth surfaces and the edges are sharp and complete. They would also check to make sure that the prisms don't easily crumble or give off too much color when rubbed against a sheet of paper.

The next thing to check was the solidity of the grains of powder. Good quality powder grains should not be easily crushed by finger pressure. It should not fall into dust at once, but should break up into angular splinters. In Germany, they would put 1.1 lbs of powder in a leather bag, which was then put in a glazing drum and rotated for 15 minutes at 15 revolutions per minute. After this, they would take it out and weigh it again and the loss of weight should not be more than 1.55%. In France, they would take an average of various powder samples and dust it initially and then take 8 kg. (17.6 lbs.) of powder and put it in a barrel designed to hold 12 kg. (26.4 lbs.) of powder, which means about 1/3 of the barrel is empty space. This barrel would then be enclosed inside a second barrel and then rolled down an incline of 15 degrees for a length of 5 meters (16.4 feet). The incline was made of planks and at the bottom was a bale of hay to stop the barrel. At the side was another incline made the same way, but falling in the opposite direction. The barrel was allowed to roll down one incline, then sent back down the other incline and the process was repeated 100 times, so that the barrel would have traveled a total of 1000 meters (3300 feet). The powder was then dusted again and the remaining grains were weighed. If the powder did not lose more than 0.20% weight after this test, then it was deemed to be of good quality.

The next process was to examine the size of the grains. They would do this by taking a sample of powder (typically about 2 kg. (4.4 lbs.)) and placing it in a frame with a number of sieves in it and a tray at the bottom. The sieves would have meshes with different sized holes, with the sieve with the largest holes at the top and the sieve with the smallest holes at the bottom. They would place the powder sample on the top sieve and then shake the entire frame for a prescribed amount of time (which depended upon country) and then see how much of the powder sample was held in each sieve. There were quality standards defined for how much each sieve could hold, depending on the powder type. For instance, for good quality rifle powder, no powder must be retained in the first sieve, less than 5% in the second sieve, up to 65% in the third sieve, up to 50% in the fourth sieve and 8% at most in the fifth sieve. Similarly, for good quality cannon powder, no powder must be retained in the first sieve, not more than 5% in the second sieve and no more than 10% in the fifth sieve and all the remaining should be in the third or fourth sieve. 

In France, they would additionally also count the number of grains in a gram of powder sample to check if they were within certain limits depending on the type of powder.

In our next article, we will study some more physical properties they would study to ensure black powder quality.

Saturday, September 17, 2016

Black Powder XXV - Pellet Powder

In our last few posts, we saw some developments in compressed black powder technology, prismatic powders and pebble powders. In today's post, we will study another type of compressed powder called pellet powder, which was invented in the 19th century.


Pellet powder was a large grain powder designed to be used in larger guns. In our above example, each pellet is a formed cylinder of black powder about 1.25 inches in diameter with a hole in the center.

Sir John Anderson of Woolwich arsenal in England invented a machine in the 19th century for their manufacture, the details of which are below:

A machine for making pellet powder invented by Sir John Anderson. Click on the image to enlarge. Public domain image.

It consists of a disk of about 6 feet diameter (the pressing table) which revolves about one of the columns. The disk has teeth all around its circumference, which allows it to be rotated by means of a pinion and handle mechanism. The disk has four round metal plates placed symmetrically, about 2 inches thick and 1.5 feet in diameter. In each metal plate are drilled about 200 cylindrical holes of about 5/8 inch diameter. Above each plate is a movable covering-plate which can be pressed tightly against it, and into each of these 200 holes a small plunger enters, which goes through the bottom part of the disk and can be lifted from below by a hydraulic press.

Two opposite plates are always pressed at the same time. As soon as the movable plates are lifted, the molds are filled with meal powder, the plates are cleaned and excess powder wiped off, and the movable plates lowered and fixed so that they close the holes on the top. Then the plungers are pressed into the molds, causing the layer of powder to be compressed to 5/8 inches in height. After this, the movable plates are lifted and the plungers are pushed further into the holes, thereby pushing the formed pellets out of the mold holes.

Click on the image to enlarge. Public domain image.

After the pellets are pushed out, the disk is then rotated for a quarter turn and the pellets are taken off the two mold-plates. Meanwhile the same operation is then carried out with the other two plates.

The pressure applied to the powder by this machine is about 0.5 tons per square inch. The pellet formed is shaped like a cylinder with one or both bases having a hollow in the middle in the shape of a blunt cone. The size of the pellets made by this machine are 5/8 inch diameter, 5/8 inch height and depth of the hole is 1/4 inch and each pellet weighs about 100 grains.

In America, the Du Pont powder company made a hexagonal pressed pellet powder, which looks like two truncated hexagonal pyramids connected by a cylindrical layer of powder.

Du Pont Powder. Public domain image.

This powder was made by the following process: A lower plate in which a number of pyramidal holes were cut was covered with powder and a second similar plate was laid over it and then pressure was applied. Depending on the thickness of the layer of powder, the cylindrical part connecting the two pyramidal halves will be thicker or thinner. After pressing, the cake is broken, this causing the grains to break off on the edges of the cylindrical part.

In Italy, they made compressed pellets in cubical form, sold under the brand name "Fossano Powder", because it was first manufactured in a gunpowder factory at the town of Fossano in northern Italy. Fossano powder is a type of "Progressive Powder" and was invented by Colonel Quaglia (the factory director) and his assistant, Captain de Maria.

Fossano Powder. Public domain image.

The manufacture of Fossano powder was done in multiple stages. In the beginning stage, meal powder was pressed into cakes of density about 1.79. Each cake was then broken up into irregular grains of about 1/8 to 1/4 inch in thickness. Then grains were then mixed again with a certain quantity of meal powder and then pressed into cakes again, with a density of 1.776. This second cake was then broken up into cubes. Therefore, each cube would be composed of powder pieces of higher density enclosed in a powder material of lower density, sort of like raisins inside a plum-pudding. The idea behind this was that due to the differing densities of powder, more gas would be produced after the powder has been partially burnt, than at the start of ignition of the powder, leading to the 'progressiveness' of the explosion (which is why it is called a "progressive powder"). This allows the pressure on the projectile to be maintained during its course in the bore and possibly increased while it is moving away.

Pellet powders burn slower than other ordinary large grained powders due to their larger grain sizes and is therefore less violent in action. Experiments in England showed that these could produce muzzle velocity greater than ordinary large-grained powder with peak pressure hitting about half that of large-grained powder.

Pellets are still available today for black powder enthusiasts:

Pyrodex 50/50 grain pellets/


Click on the image to enlarge.

Click on the image to enlarge

The above images show modern pellets available today in many sporting goods stores. However, these are made of black powder substitute, not original black powder. Black powder substitute is less sensitive to ignition than real black powder and is more energetic.


Saturday, September 10, 2016

Black Powder XXIV - Pebble Powders

A couple of posts ago, we saw why larger grain black powders were more suitable for larger guns and artillery, and studied two powders that were developed to handle this: compressed powder and prismatic powder. In today's post, we will study another type of black powder designed for larger calibers, which was in use in the 19th century. Today's object of study will be pebble powders.

Pebble powders were generally made in two grades: the P type (which were cubes of approximately 1/2 to 5/8 inches in size) and the P2 type (which were 1.5 inch cubes).

The process of manufacturing pebble powders started off similar to manufacturing other finer grain powders, until the process of pressing the powder into cakes. The pressed cakes were formed into slabs of about 15 inches x 30 inches and thickness depending on whether P type or P2 type was being made (i.e. 1/2, 5/8 or 1.5 inches).

For P type powders, the pressed cake slabs were then fed into a cutting machine:

A cutting machine for manufacturing P type pebble powders. Click on the image to enlarge. Public domain image.

The exploded view of the machine above was invented by a Major Morgan and was in use at the Royal Gunpowder Mill in Waltham Abbey, England. It consists of two pairs of phosphor-bronze rollers which are at right angles to each other and at different heights. Each roller has knives attached to its circumference, with spaces between the knives corresponding to the required size of the powder cubes. The pressed cake enters the first pair of rollers and is cut into long thin strips and these strips then fall on to a conveyor belt which carries them to the second pair of rollers, which are at right angles to the first pair. The second pair of rollers cut the long strips into cubes.

It may be seen that if a first pair of rollers were fixed, then the second long strip cut would fall onto the first and the third one on to the second and so on and the result would be long strips piling up in one location on the lower conveyor belt. To avoid this, the upper pair of rollers are mounted on a board which is arranged to move back and forth, the basic mechanism of which is shown below.


The bottom of the board has a fixed slotted bar. The chain has a pin on one of its links that engages the slotted bar. As the chain moves along its two rollers, it pulls the board above it in a back and forth motion. This results in the long strips cut from the first set of rollers falling side by side instead of one above the other.

For P2 type powders, the cubes were generally cut by hand, by using lever-knives (i.e.) knives hinged at one end, with an handle at the other, much like a modern day paper trimmer. The press cakes were cut into long strips and then cut across into cubes.

After this, both P and P2 type powders were sent through a glazing and dusting process, to ensure that edges and corners of the cubes were rounded off and sharp edges removed. This ensured that the cubes would have a harder surface and would not produce dust or waste when being stored or transported around.

The powder was then dried similar to the process of drying the smaller grain powders, except that the temperature of drying was lower and the drying period was correspondingly longer. The drying process was slower to avoid forming cracks on the cubes. After this, a finishing process followed, with the powder being run in wooden barrels, which combined sifting the powder along with a finish glaze. A small quantity of graphite powder was introduced into the finishing barrels to give the grains a glossy finish and render them less hygroscopic.

In our next post, we will look at pellet powders.

Monday, September 5, 2016

Black Powder XXIII - Prismatic Powder

In our last post, we studied the invention of compressed black powder by General Thomas Rodman of the US Army. While this idea had sound theoretical fundamentals and also could be demonstrated successfully in trials, there were some practical difficulties encountered when manufacturing this powder in bulk and deploying the compressed powder cakes in the field. The main issues were that it was hard to press such large, heavy cakes of powder in the presses of the time and the large perforated cakes of powder also had structural integrity problems and tended to break up into smaller grains during transport, or while being handled in a battlefield.

A solution to this problem was proposed by another American, Professor Robert Ogden Doremus, a professor of chemistry, and a co-founder of New York Medical College.

Robert Ogden Doremus. Click on the image to enlarge. Public domain image.

Doremus' idea was that instead of pressing together a large cake of powder equal to the bore of the cannon, he suggested manufacturing them into hexagonal prisms of a smaller size, with comparatively smaller holes running through them. This powder was called prismatic powder.


The number of holes in each prism could be less in number (usually between 1 and 7) and these could be stacked together to form a rigid cartridge, much less liable to break up during manufacturing and transport. Due to their smaller sizes, it was easier to manufacture a number of smaller hexagonal cakes, rather than one large cake weighing several pounds in weight.

Another idea also due to Professor Doremus was to make different sections of a cartridge with different densities of powder, whereby the density would affect the rate of combustion and maintain a higher average pressure. The idea was to pack the first part of the cartridge under high pressure, then make two more layers on the same cartridge under lower pressures.

During the Civil War, a Russian military commission visited the United States and were greatly impressed by the results shown by Doremus' prismatic powder and undertook to develop and use prismatic powder in their large guns as well. Doremus also visited Paris and impressed the French with his new powder and was authorized by the French ministry of war to modify the machinery at a French powder factory to produce his prismatic powder. In fact, a large portion of the Frejus Rail Tunnel between France and Italy was blasted away with "la poudre comprimée". Pretty soon, many European countries (Italy, Germany, France, UK etc.) started to manufacture prismatic powder as well.

The cakes were generally made from granulated powder, which was then compressed under pressure, either using a press driven by gears, cams and pistons, or by a press driven by hydraulic pressure.

A cam-press for making prismatic powder.
This press was built by the Grunsonwerk of Buckau, Germany. 
Click on the image to enlarge. Public domain image.

A hydraulic press for making prismatic powder.
This press was manufactured by Taylor and Challen of Birmingham for the Royal Gunpowder Factory, Waltham Abbey, England
Click on the image to enlarge. Public domain image,


To make this powder, granulated powder containing about 4% moisture was put into the hopper of the press. The more moist the powder, the easier it is to press it into shape, but the powder can't be too moist, otherwise the saltpeter will migrate to the powder's surface while drying. The powder was filled into several molds, the height of which was adjusted depending on the moisture content of the powder and the moisture content in the air that day. Then, the press was activated and pressure was applied to the powder in the molds, to form prisms of the required shape and size. The sizes and densities of the prisms varied by country. For instance, in England, the prisms were about 1.5 inches high and had a desnity of 1.78, whereas in Germany, the prisms were about 1 inch high and 1.575 inches over the angles, with the weight being about 1.41 ounces and density of 1.66. Hydraulic presses were generally used in England, Germany and France towards the latter part of the nineteenth century, but cam-presses were still in use in some parts.

After pressing, the prisms were dried in special drying-houses using trays. The trays were made of narrow wooden strips, with enough gaps between them to let air pass through, but not big enough to let the powder fall through. At Waltham Abbey, the drying process was done slowly for 140 hours and the dried powder contained less than 1% moisture. At Spandau, Germany, they would dry the powder at a faster rate by using air at a temperature of 122 °F for about 48 hours, after which the powder would contain less than 0.75% moisture.

In our next post, we will look into another type of powder called "pebble powder", which was manufactured in the 19th century.

Tuesday, August 30, 2016

Black Powder XXI - Damaged Powder

In our last post, we saw how black powder that had absorbed some moisture in the field, could be reworked to become useful again. However, this reworking process only worked if the black powder had absorbed a smaller amount of moisture from the air (< 7% by weight). Unfortunately there were situations where the powder could absorb a lot more than this. In today's post, we will discuss what they did with the powder in the 19th century when this happened.

Remember that black powder was not always stored indoors in a warehouse under dry conditions. It may have been transported in the cargo compartment of a ship, or perhaps it was shipped by cart to some distant battlefield. There were plenty of situations where the barrels could have been exposed to a lot of water (e.g.) water frequently seeped into cargo compartments inside the ships and had to be periodically pumped out, carts could be driven through thunderstorms, the barrels could have been frequently opened and closed in wet conditions in the field etc. In such situations, the barrels could absorb a lot more moisture than 7% by weight and the powder was considered damaged. Armies and Navies would typically send this damaged powder back to the factory, where they would deal with it.

At the factory, they would first figure out how much moisture the powder contained, using the method we studied in our previous post. If it was well below 7% by weight, it could be dried and recovered, as we pointed out in our previous post. Another technique was to take a small amount of the damaged powder and mix it with a barrel of newly manufactured powder, so that the overall moisture content of this mixed powder was within tolerable limits. For instance, the mix could consist of about 10% damaged powder and 90% new powder and would have pretty much the same propulsive force.

However if the powder was too badly damaged by moisture, then they would usually try to recover the potassium nitrate from the mixture, as it was the most valuable ingredient. Remember that saltpeter (the source of nitrates) was a hard-to-obtain substance for many centuries and England controlled the source of most of the world's supply for decades. Therefore, many countries found it worthwhile to try and extract as much nitrate as possible from the damaged powder. For instance, in the Confederate States, they had a Damaged Powder Works in Augusta, Georgia, to which all damaged powder from the field was sent to.

At the Damaged Powder Works, they would empty 8 barrels (800 lbs.) of powder into a large copper vessel and then add about 200-240 gallons of water. The vessel was then heated until its contents began to boil. The boiling water would dissolve the potassium nitrates in the powder, while the sulfur and charcoal remained undissolved. After this, the hot water was pumped out of the vessel through a double filter arrangement and poured into shallow crystallizing pans, where the liquid would cool and form nitrate crystals. The crystallizing pans would be shaken while the liquid was cooling, so that the nitrate crystals formed would be of small size. Since charcoal and sulfur don't dissolve in water, they remain behind in the vessel and filters. This method could recover over 95% of the nitrate content in the damaged powder. The recovered nitrate crystals were then sent back to the gunpowder factory to be used to make black powder again.

In the case of lightly damaged powders, the Damaged Powder Works often reworked it to make blasting powder, which is a low-grade black powder with a lower percentage of niter and more dust. To do this, they would take the damaged powder and add more sulfur and charcoal, so that the percentage of niter was reduced. The mixture would then be incorporated for a short time and then granulated to form blasting powder.

The Damaged Powder Works not only recovered nitrates from damaged powder, they also tried to recover it from byproducts of the manufacturing process as well, since niter was such a precious substance. They would try to recover saltpeter from the sacks that it was shipped in, from sweepings from the factory floor of the powder mill and even from washing the workers' clothes. The remnants of the mother liquor from the niter refineries were also sent over, so that they could extract the last possible bit of nitrates from there.


Sunday, August 28, 2016

Black Powder XIX - More on Packing

In our last post, we talked about the packing process of black powder in the 19th century. However, that post went a little easy on details about the containers used, so we will discuss those in today's post.

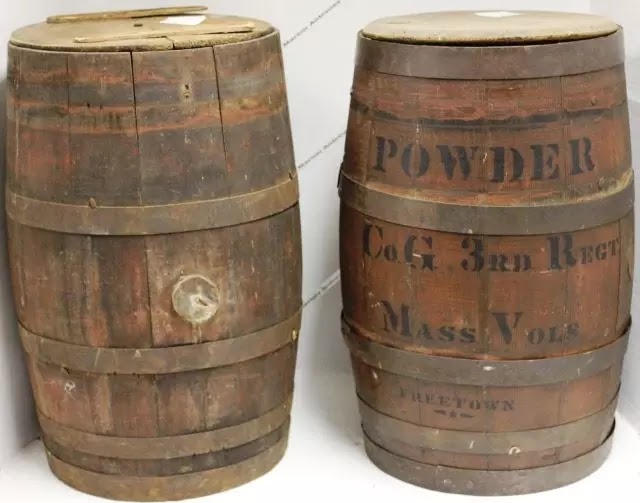
Black powder was generally shipped in boxes (cases) or cylindrical containers. Barrels were used because they were designed to hold goods without risk of leakage and were used for centuries for this purpose. On the other hand, boxes are easier to stack on top of each other than barrels and waste less room.

The boxes were usually made of copper and had powder loaded in a linen bag, or they were made of wood (which was cheaper) and had a slightly smaller box inside, into which the powder was loaded. Boxes varied in size, depending on the country, the type of powder etc. For instance, in England, some cases were about 2 feet long, 2 feet wide and 6 inches high. In the Confederate States, their boxes were about one foot long, one foot wide and 2.5 feet long. In Austria, their boxes were big enough to contain about 64 lbs. of powder. For sea duty, the boxes were generally made of copper. While boxes cannot be rolled around easily like barrels, they can be packed together more tightly than barrels can, which is why some factories started to switch from barrels to boxes towards the end of the nineteenth century.

Containers generally came in multiple sizes: Barrels, Kegs and Canisters.

Barrels are generally the largest of these containers. Typical barrels of the nineteenth century were about 2 feet high and about 1 to 1.5 feet in diameter. Capacity of the barrels varied by country, but most could usually hold about 110-120 lbs. of powder. However, these barrels were usually only filled to about 90% of the capacity (e.g. they would only fill about 100 lbs. of powder to a barrel capable of holding 110 lbs.). This was done so that the powder would have room to move inside the barrel during transport and wouldn't get caked.

A stack of powder barrels made in England. Click on the image to enlarge.

Another stack of powder barrels. Click on the image to enlarge.

Most barrels would have a hole of about 1.5 to 2 inches diameter drilled to the top of the barrel, which would then be plugged with a wooden screw. This way, if someone wanted to access the powder inside the barrel, they only needed to remove the screw instead of the entire top of the barrel. A leather washer soaked in wax and turpentine would be placed under the screw head, which served to keep moisture out. The image below shows an example of this:

Notice the screw at the top of the barrel. Click on the image to enlarge.

Kegs were generally built on the same principle as barrels, but were much smaller in size, typically holding about 25 lbs. of powder. Also, instead of having an opening on top, most kegs had an opening in the middle to access the powder.

An example of a powder keg

Kegs are much easier to transport than barrels on account of their lesser weight and were favored in places where there wasn't much room to move around in (e.g. on board ships).


A couple of Civil War era powder kegs. Click on the image to enlarge.

Finally, we have canisters. Unlike barrels and kegs, these were generally made of metal and had the least capacity of the three container types.

A black powder canister. Click on the image to enlarge.

Powder canisters typically held about 0.5 to 1 lb. of powder. The above example is a canister made by the Eureka Powder Works of New Durham, New Hampshire. It is made of steel, is about 4.75 x 4 x 1.75 inches in size and has a paper covering on the outside with hunting scenes printed on it. Due to their small size and capacity, these are much lighter than the other containers we have studied above and are easy to transport. Unlike barrels and kegs, these were intended to be sold to private individuals rather than military units.


Thursday, August 25, 2016

Black Powder XVIII - Packing

In the last few posts, we have studied the process of manufacturing corned black powder in the nineteenth century. Today, we will study the process of packing the black powder in the nineteenth century.

Black powder from the factories was usually packed in barrels or cases.

 Powder cases were usually made of copper and the powder was put in a linen bag and placed in the case. Alternatively, the case was made of wood, with a second inner box also made of wood.

Barrel making was an art that was well developed over several centuries, and by the 19th century, people already knew how to make barrels able to hold liquids without leaking. However, powder manufacturers usually put the powder in a linen bag and then placed it in the barrel, or in some places (such as France), they used a second inner barrel. For military purposes, some manufacturers coated the inside of the barrel with paper to make it leak-resistant.


In the 17th and 18th centuries, it was the custom in the German-speaking states of Europe, to coat the barrels on the inside with linseed oil. This was done to protect the powder from moisture.

There was a good reason to use a cloth bag inside the barrel: In order to fill the barrel, the upper hoops have to be loosened, so that the top of the barrel can be removed. Because of this, the staves expand a bit and the openings may fill up with some powder grains as the powder is poured into the barrel. Then when closing the barrel, the grains in the openings will get crushed. If something harder than wood, such as a grain of sand or a piece of metal, get into the openings, then a small impact, such as a blow from a wooden hammer, could cause the powder to ignite. For this reason the powder was first put in a bag, which was then put inside the barrel.

A powder keg made by American Powder Mills in the 19th century. Click on the image to enlarge.

The barrels were closed using about six to eight hoops. Experiments made in the 19th century showed that hoops made from barked willow or hazel-wood, preferably cut in winter time, worked better than unbarked wood, because they didn't suffer from wood rot. The bags were usually made of loosely-woven linen cloth.

Each barrel was placed on a scale and weighed before filling and then the barrel was kept on the scale as powder was poured in using a copper funnel, until the desired weight of powder was filled in. The weight of powder put into the barrel depended upon the type, the size of the barrel, the country of manufacture etc. The barrels were usually filled to about 90% of their capacity, because it was believed that rolling the barrels occasionally prevented the powder inside from caking. After this, each barrel had a label attached to it, containing details such as the type of powder, the year that it was manufactured, the name of the manufacturer and factory location, the number of the supply, the weight of powder and the seal of the person that examined the barrel. In many places, the color of the label also indicated the type of powder contained in the barrel.

In 17th century France, they used the linen bag inside the barrel method of packing. Towards the beginning of the 18th century, they used the method of one barrel packed inside another barrel. The inner barrel (called the baril) was lined with cloth and filled with about 110 lbs. of powder and then placed inside a larger outer barrel (called the chape). The outer barrel contained details such as the year and place of manufacture, powder type, average range and average muzzle velocity etc. Instead of barrels, they sometimes also used wooden boxes lined with sheet zinc, which were filled and then put inside a second wooden case. For transport in ships, copper cases enclosed in wooden cases were used.


Powder keg made by American manufacturer Laflin & Rand. Click on the images to enlarge.

The above two images show a wooden powder keg made by the Laflin & Rand Powder Company of New York. This company was once a major competitor to Dupont in 19th century America. The top of the keg has a stopper (visible in the second image) and has the markings "FF" to indicate that the contents of the barrel are of a grain size suitable for use with rifles. The bottom of the keg has the marking, "Laflin & Rand Powder Co. New York", indicating the manufacturer name and factory location.


Wednesday, August 24, 2016

Black Powder XVII - Blending

In our last post, we studied what goes on in the finishing process of manufacturing black powder, namely some more dusting, blending and sifting. Despite using the utmost care in the sifting process, the powder will always contain a certain percentage of grains which are above or below the desired grain size. This percentage varies quite a bit as the various operations described previously take place. Therefore, manufacturers would often use a blending process to mix the contents of various batches together, so that the end result is a powder of more uniform performance. We will study that blending process from the nineteenth century in today's post.

In England, some mills would combine powders from different batches in the dusting reels that we studied about in our previous post.

Click on the image to enlarge. Public domain image.

Another technique that was common in England was to use a large wooden box with four equal sized compartments, each of which was big enough to hold one barrel of gunpowder. At the bottom of each compartment is a sliding door that leads down to a central chute. After the compartments are filled, the sliding doors are opened simultaneously and the powder from all four compartments pass through the central chute and are mixed together on the way out.

In Germany, the process was done similarly. Six copper funnels are arranged in an inclined position around a central main tube and the other end of the central tube ends in a short leather tube, which can be lifted by using a rope, which puts a kink in the hose and prevents the powder from running out of it. At Spandau, each funnel held about 220 lbs. (100 kg.) of powder and at Dresden, each funnel held about 440 lbs. (200 kg.) of powder. The German manufacturers would offer two blends, a special blending and a general blending. In a special blending, they would place two barrels of each powder to be blended in each funnel (in Dresden, they would use four barrels per funnel since the funnels in Dresden were twice the size of those in Spandau). When all the funnels were filled up, a barrel was placed below the leather pipe and then, the leather pipe was opened to blend the powder in. After twelve preliminary blendings were done, they would perform a final blending operation by taking a barrel or two from each preliminary blending and then repeating the process until the preliminary blendings were all mixed together again.

The process in Switzerland was similar. A large square box with a pyramidal bottom, which could hold about 1350 to 1600 lbs. was used. At the bottom of the pyramid was a perforated pipe fixed to the funnel opening and covered with a damper. They would take about 100 lbs. from each powder to be mixed and alternately pour them into the box. After the box was filled, the damper was withdrawn and the powder would pass through the perforated pipe and get mixed as it fell into the barrel below.

In France at the factory of Sevran-Livry (a suburb of Paris), the process was a bit more automated. They used a wooden frame with an arrangement of eight trays in two parallel rows of four each. Each frame had a hole in the center covered by a shutter valve, which could be used to regulate the flow of powder. Below each frame was an endless cloth belt upon which the powder would fall. At the end of the these cloth belts was another cloth belt running at right angles to the first set of belts. A system of gears ensured that the first endless belts ran at a speed of 10 times greater than the central belt. At the other end of the endless belt was a trolley carrying at least two barrels and the belt would drop the blended powder into one of them. As soon as the barrel filled up, the trolley would move so that the second barrel would start to fill and meanwhile, the first full barrel was removed and emptied or replaced with another one.

In our next post, we will study the packing process of the black powder.

Tuesday, August 23, 2016

Black Powder XVI - Finishing

In our last post, we studied how black powder was dried in the nineteenth century. After the drying process comes the finishing process, which we will study in today's post.

During the drying process, there is a small amount of dust generated again because removing the moisture causes some of the grains to fall apart. Therefore, the powder is again subject to another dusting and glazing process (which we studied earlier) followed by a sorting process. These three processes are classified together as the "finishing process".

Click on the image to enlarge. Public domain image.

The above image shows a cylindrical sieve manufactured by J & E Hall of Dartford, England. It consists of a horizontal reel about 8 feet long, and 2.5 feet diameter, covered by a fine gauze made of brass wire or silk cloth. Each cylinder was filled with about 350 lbs. (about 160 kg.) of powder and the cylinder was rotated at about 45 revolutions per minute for about three hours. Sometimes, a little graphite powder is added to increase the glossy finish of the powder and render it less hygroscopic. Any dust in the powder grains falls through the gauze into the box.

Due to this dusting and glazing process, the shape and size of the grains are somewhat altered and therefore, many factories would then use a sorting process for a second time. In Germany, the process was to use a sifting reel, much like the apparatus above. However, the first part of the reel would have a wire gauze of a small mesh size, then the next part would have a gauze of a larger mesh size and the next part would have a still larger mesh size and so on. The whole reel would be tilted along its length and rotated at about 12 revolutions per minute. The useless dust would fall through the first part of the reel, then the useful size grains would fall through the next mesh and only the large size grains would remain in the reel.

In other German and English factories, they would mount four sieves from the ceiling, attached to a mechanism to provide a shaking mechanism to the sieves at about 120 strokes per minute. The largest mesh size sieve would be closest to the roof and the finest sieve at the bottom. Powder would be added to the top sieve and the sieves would be vibrated. The largest grain powder suitable for cannon would remain in the top sieve, and grains suitable for rifle and pistol powder would be collected from the sieves below.

Despite putting a lot of care in the sorting process, the powder always contains a certain percentage of grains above and below the desired grain size. Therefore, in order to maintain more uniformity in the process, the powder was then subject to a process called blending, which we will study in the next post.

Wednesday, August 17, 2016

Black Powder XV - Drying the Powder

In our last post, we studied the processes of dusting and glazing the powder. In today's post, we will study the next process in line: the drying process.

As we studied previously, the ingredients of black powder are moistened before mixing together for safety reasons. In addition to that, potassium nitrate in the saltpeter is slightly hygroscopic (i.e. it absorbs moisture from the atmosphere) and if the saltpeter is somewhat impure and contains calcium nitrate, then it will be very hygroscopic. Black powder is more effective when there is less moisture content, which is why we have the old saying about "keeping your powder dry." We will study how the drying process worked in the 19th century in today's post.

Back in the early days of gunpowder manufacture, drying was done out in the open air. The black powder was simply spread on trays with a wool cloth at the bottom and the trays were placed outside where they could be exposed to the sun's rays. Every few hours, a person would go out and turn the powder grains, until the moisture content was substantially reduced. In fact, in some factories, people would do this once before the first dusting operation. The advantage of drying in the open air is that it saves on fuel costs and the chemical properties of the powder aren't changed either. However this method has disadvantages as well: the rate of drying depends on the humidity of the air. Also, if it is a windy day, the powder becomes much more dusty. Also, if the day happens to be cloudy, then the drying operation will take much longer. It also can't be done during rainy days.

Since natural drying using the sun has many disadvantages, people started to switch to artificial methods of drying and by the 19th century, artificial drying became the dominant way of drying powder. There are four main techniques of artificial drying:

  1. Drying by using warm air.
  2. Drying by using steam or hot water.
  3. Drying by using cold air with the water vapor removed (i.e. the air is dry and very low humidity)
  4. Drying in a vacuum.
In 1632, we have the account of one Furtenbach, who stated that people had tried drying black powder by placing the black powder grains on copper pans over a fire, but this was banned by law in many places because men had been killed by it. The next obvious idea was to use the heat radiated from a fire, but keep the powder a little distance away from the fire. This led to people building fires in the center of the room and powder placed all around it. Periodically, a worker would go in and stoke the fire to keep it burning, but a small spark rising from the flame could potentially set the room on fire and this type of accident did happen quite a lot. Therefore, the next technique was to put the fireplace in an adjacent room, with no direct connection to the drying room. The fireplace would be surrounded by a copper jacket so that heat could only be passed via convection or radiation. However, by the 19th century, this method of drying was not used any more and in fact, many countries had laws to explicitly ban this method of drying.

Using steam for drying was introduced into the UK in 1780 for the first time. Steam was generated in a separate building far away from the drying room, so that the fire used for generating the steam is kept far away from the black powder. The steam was then conveyed using copper pipes, to the drying room, where it would be piped over wooden boxes covered by copper pans on top, the steam being at temperatures between 130-170 degrees Fahrenheit. The powder was also turned periodically by using a rake, to prevent it from caking during the drying process.

Another technique that was very popular in England and Germany involved blowing a hot current of air over the powder in large drying rooms or special drying-boxes. This method allowed the drying rate to be controlled so that it was not too fast, which meant that the pores of the powder wouldn't open up too much and therefore the powder would be less hygroscopic after drying.

At the Royal Gunpowder Mills at Waltham Abbey, a single drying room could hold about 2.5 tons of powder and the powder was placed in trays on wooden frames. Below the frames, a series of pipes carrying steam were arranged close to the floor. Holes were drilled into both the roof and the floor, so that the heated air from the floor would rise up and exit through the holes in the roof, and be replaced by fresh air entering through the holes in the bottom. The temperature of the pipes and the air was controlled depending on the type of black powder, the size of the grains and the amount of moisture contained in it. For granulated powder, the drying operation took about 6 to 12 hours.

In other setups, such as those in England, France and Germany, fans were used to blow cold air over steam heated coils and then the hot air was piped into drying boxes.

Apparatus to produce hot air for drying. Click on the image to enlarge. Public domain image.

The above image shows one such apparatus to produce hot air. The heating coils are made of iron and steam is passed through them, Air is blown from the top using a fan and the hot air exit pipe at the bottom is connected to drying boxes. The apparatus is enclosed by brick walls to hold in the heat.

Another technique was to use a current of cold air from which all moisture has been removed previously, using chemicals such as calcium chloride, caustic lime or sulfuric acid. The dry air tends to absorb the moisture from the powder and carries it out.

Drying apparatus using cold dry air. Click on the image to enlarge. Public domain image.

The image above shows one such apparatus. There is a wooden box A, which runs along the whole length of the drying room. About half way up the box, longitudinal strips (b) are fixed, on which a frame (c) covered with a wire gauze rests, covered with dry calcium chloride lumps. The bottom part of the floor is lines with zinc sheets. The bottom of A is inclined towards the right, where there is a pipe D to remove the solution of calcium chloride that will be formed by the drying process. The air is forced in by fan (E) and passes through the layer of calcium chloride and is then piped into the drying boxes, while the calcium chloride solution is collected and after evaporation, it can be reused in the box again.

After the drying process, the moisture content of the powder was generally below 1% or so. The time of drying could vary depending on the type of powder, the temperature of the air, the size of the powder grains etc. One point to note is that drying on frames meant that the trays closest to the steam pipes dried the fastest and those trays which were placed higher up were subject to somewhat cooler air, which was also carrying some moisture from the lower trays. However, the fact that the rate of drying and the temperature could be uniformly controlled made this method very popular in the nineteenth century.

The next process down the line is the final dusting, glazing and finishing process, which we will study in our next post.

Monday, August 15, 2016

Black Powder XIV - Dusting and Glazing

In our last two posts on the study of black powder manufacture in the 19th century, we studied the process of granulating the powder into grains. The powder coming out of the granulating machines is called "foul grain" and must be further processed. In today's post, we will study the next couple of processes in line: dusting and glazing.

So why dust and glaze in the first place? Dusting is the process of removing all the smaller sized particles (the "dust") from the black powder, so that they don't end up in the bottom of the barrel and cause the last few charges to burn faster (since smaller grains burn faster in general). Glazing is done for a few reasons: First, it polishes the outer surfaces of the powder grains, thereby diminishing the tendency of the powder to absorb moisture from the atmosphere. Second, it helps make the powder grains less likely to break up into dust while being transported. In general, glazing increases the durability of the powder grains. Glazing also increases the density of the powder.

Dusting is done by passing the grains of powder through sieves, so that the grains of a particular size are retained and the smaller dust grains fall through. In smaller factories, this was done by hand or through a shaking machine, using a series of sieves made of hair for filtering the grains. In larger factories, dusting reels were generally used in the 19th century, as these were more suitable for large-scale production. The technology for dusting reels actually came from flour mills. A dusting reel has a cylindrical frame about 1.5 feet in diameter and 8 feet long. The surface of the reel is covered by a fine gauze made of copper wire, silk or canvas. The cylinder is set up with a small tilt from the horizontal. The cylinder is also enclosed by a case to catch the dust, but is open on both ends. The cylinder is set up to be rotated by a belt at a speed of around 40 r.p.m. The powder is fed continuously in the upper end from a hopper. As the cylinder rotates, the powder grains slide down its length to the lower end. Any dust particles that are too small in size fall through the gauze, while the larger grains stay inside the cylinder and slide down to the lower end, where they can be collected into barrels.

A pair of dusting reels from the early 1800s.

The wooden box case enclosing the dusting reels prevents the fine dust from flying around the building. Periodically, a worker would open the doors and empty the dust accumulated inside the box. The powder was usually run through the dusting reels twice and deemed to be sufficiently dusted.

After dusting the powder, the next process was to glaze it. The process of glazing smooths out the grains somewhat by breaking off the sharp angles and points on the grains and also stops up the outer pores of the grains, which makes the exterior of the grains tougher and more impervious to moisture and less likely to turn to dust. It also increases the density of the grains slightly -- for instance, a powder with density 0.810 before glazing increases its density to 0.893 after 42 hours of glazing. Also if glazing is done for long enough, it can improve the combustion of the grains a bit as well, as the niter ends on along the surface of the grains.

The process of glazing was carried out in wooden drums similar to those used for mixing the ingredients, which we studied earlier. the chief differences are that these drums don't have ribs on the inner side of the drum, nor do they have an axle passing through the center of the drum. Instead, the axle attaches to the circular ends of the drum by means of bolts fastening it to a cross piece on either end. The drum has a long door across its length, which can be opened to drop the glazed powder into a funnel after the glazing operation is done. As the drum is rotated, the powder grains get thrown about and hit each other and the sides of the drum, thereby becoming polished. The glazing drums generally have speed counters to regulate the speed of a drum during the process. The speed of rotation and the time of rotation depends on the powder being glazed and where it was manufactured. For instance, in England, R.F.G. (Rifle Fine Grain) grade powder was generally glazed in drums about 2 feet wide and 6 feet in diameter and rotated at about 12 revolutions per minute. Each drum could take about 900 lbs. of powder. For R.F.G powder, the drums were run for 5.5 hours each, for R.F.G2 powder, the process took about 10 hours. No graphite was added to these powders, as the friction and heat caused by the motion was enough to produce a brilliant glaze. For R.L.G (Rifle Large Grain) powder, it was run for about 1.5 hours at 34 r.p.m with one ounce of graphite added per 100 lbs. of powder. R.F.G4 grade powder was glazed for about 3 hours, the graphite being added to the drums after they had run for 2 hours first. The purpose of adding graphite to larger grain powders is to increase the gloss of the powder and render it less likely to absorb moisture due to the increased density of the surface layer. Over in America in the Confederate states, we know that their manual specified that the grains were to be glazed for ten to twelve hours, with the drums rotating at least 9 times a minute.

During the glazing process, any inferior quality grains (i.e. those that were likely disintegrate during transport later) get turned into dust as well. Therefore, many manufacturers would run the powder through the dusting process for a second time after the powder had been glazed, to remove any dust that might have been generated by the glazing.

The machinery for both the dusting and glazing operations were usually powered by water-mills, which is why many powder works were located near fast-flowing sources of water. Alternatively, horses were also used to drive the machinery.

Photo from 1894 showing a former Confederate Powder Works building in Augusta, Georgia

The two houses that appear on the upper left corner of the picture above were once part of the Confederate Powder Works in Augusta, Georgia. The two buildings were where the dusting and glazing operations were once carried out and survived the end of the Civil war, as the picture above was taken in 1894.

Interestingly, though the Confederates used separate dusting and glazing operations through most of their period of operation of the facility, they also attempted to speed things up by combining both steps into a single process along with drying. The process placed the powder into a cylinder as above, but the axle passed through the drum and was hollow and had perforations. Air was heated by passing over steam pipes and this hot air was fed through the axle, the idea being that the hot air would dry the grains and carry the dust away, while the agitation of the grains by the revolving cylinder would glaze the grains as well. However, this process was not perfect and contemporary records show that powder was often sent back to the mill for reworking the glazing process using the traditional method.

In our next few posts, we will study the next operations in line: the drying and finishing processes, followed by packing.