Sunday, April 5, 2015

Manufacturing Cartridges in the 19th Century - Part III

In our last couple of posts, we studied how the cartridge cases and primers were manufactured during the middle of the 19th century. In today's post, we will study how the bullets for the cartridges were made. As before, we will study how the process was done at Kynoch, a large British manufacturer of ammunition, which was using the latest technologies and machinery available during that era.

While we have studied cast lead bullets in the past, by the 19th century, the casting method was considered too slow for mass production. Therefore, bullets were made in quantity using machinery. We will see how this was done in that era.

The first order of business was to prepare the lead for bullet making. Pure lead was not used for bullet manufacture as it is too soft. Instead, lead was melted and then, zinc or tin were mixed with the lead to harden it. This lead alloy was then forced out into long round ropes of metal, which were then coiled and loaded onto bullet-making machines.

The bullet-making machines at Kynoch were marvels of mechanical technology at that time. The best machines were capable of measuring out a length of metal, cutting it from the rope, feeding the cut piece into a die shaped like a conical bullet, forcing it in with a conoidal punch and then ejecting the finished bullet into a box. The bullets were then regulated in a press, to ensure that they were as cylindrical as possible. Each bullet was then placed in a lathe and wrapped with a paper patch, which was cut off and twisted while the bullet was revolving in the lathe. The paper patches were then waxed on to the bullet and the bullets were now ready to be loaded.

There were a few advantages of making bullets this way, versus the old casting process. For one, it was faster to manufacture bullets using this method. The bullets were also much more uniform in size, shape and weight than cast bullets. In addition to this, the possibility of casting defects, such as air pockets and hairline cracks, did not occur on these machine-made bullets.

The factory at Kynoch not only made lead bullets, but also made composite bullets (e.g.) jacketed bullets. To make these, the outer jacket was made of a copper alloy. The Kynoch factory used an alloy of 80% copper, 20% nickel, with small quantities of manganese, iron and silicon. This alloy was chosen because it is tough and hard and produces a shiny surface that doesn't tarnish easily. The alloy has a tensile strength of 27 tons per square inch. The alloy was rolled into sheets of 0.04 inches thickness. These sheets were then made into jackets using a process similar to how cartridge cases were made, which we studied earlier (i.e.) the round blanks are punched out from the sheet, then each blank is cut out and made into a cup and then passed to a drawing machine, where the jacket is drawn out gradually to the required length by multiple drawing operations. Unlike making the cartridge cases, annealing and pickling in acid were not necessary between each drawing stage and seven drawing operations were sufficient to elongate the blank into a outer jacket for a .303 bullet. The inner part of the bullets (the cores) were made of a lead alloy. Lead was mixed with 2% antimony and squirted into rods of the required diameter. These rods were cut into pieces of the length desired and each piece was placed into a jacket by hand. The composite bullet was then forced into a die, so that the edge of the jacket was turned down over the base. The final finishing processes consisted of adjusting the diameters of the bullet, trimming and adding the rings at the base.

It may interest the reader to know that some jacketed bullets are still made today, using a similar process. Here's a video showing how Hornady makes jacketed bullets today:


In the next post, we will study how the cases, primers and bullets were brought together to load a complete cartridge. Until then, happy viewing!

Tuesday, March 31, 2015

Manufacturing Cartridges in the 19th Century - Part II

In our last post, we studied how metallic centerfire cartridge cases were manufactured in large factories in the 19th century. We will continue our study of the manufacturing process in today's post.

Where we last left off, we'd just studied how the brass cases were shaped. The next step is to attach primers to the cases. In the 19th century, primers were made of copper caps. The process worked as follows:

The copper caps are made by punching blanks from copper sheets and then formed into small cups (similar to the cartridge cases in the previous post). A bunch of these caps are placed onto a plate with indentations in it to hold the caps in place. Then, this plate is covered by two other plates, which have holes drilled into them, corresponding to the positions of the caps, when all three plates are placed on the loading frame. The top plate can move horizontally for a short distance and when it is moved, the holes on this plate move clear of the holes in the middle plate, and thus it forms a bottom to the holes of the top plate. The shock-sensitive priming material is made damp with water and carefully spread over the top plate, so that it fills all the holes drilled into it. The surplus priming powder is brushed off. Then the top plate is moved back into position, where its holes correspond to the holes in the middle plate and the caps in the bottom plate. The priming material thus falls through the holes into the priming caps. The caps are then moved to a press and a tinfoil disk is pressed on to the priming powder and then varnished over with spirit varnish, to make the caps waterproof.

Manufacturing the priming powder and filling the caps were both considered as dangerous operations in the 19th century. Therefore, the British parliament passed a law that specified that only one person was allowed into the room where the priming powder was made and the room where the caps were filled. This law was to ensure that if there was an accident, there would be minimum casualties.

The caps are placed on the bases of the cartridge cases prepared in the previous post and then they are pushed into place by a descending rammer and are now ready to receive the propellant powder and the bullets.

In our next post, we will study how the bullets were made and the propellants loaded in the 19th century manufacturing process.

Sunday, March 29, 2015

Manufacturing Cartridges in the 19th Century

In today's post, we will look at how brass centerfire cartridges were manufactured in the 19th and early 20th centuries. The process we will look at was what was used at Kynoch, a large British manufacturer of ammunition. The brand name "Kynoch" is still used today to sell cartridges, even though they have been merged into a larger company.

The Kynoch factory during this time period, was located in Witton, an inner city area of Birmingham, England.  The factory had several hundreds of machines in a single building, turning out cartridges of many shapes and sizes. The machinery used there can be considered as the latest technology for that era.

The process we will study today is what was used to manufacture solid-drawn brass cartridge cases. The first step in the process is to make flat sheets of a type of brass called "cartridge brass". The brass sheet metal is then taken to a machine that punches out circular blanks from the sheet.

Public domain image.

The image above shows a blank to be used to manufacture cartridges for a Mauser rifle. The next step is to put the blank through a drawing machine, where it is forced through a die with a tapering aperture by a ram under high pressure. This produces an object that is shaped somewhat like a cup or a thimble, as shown below:

Public domain image.

Naturally, the pressure applied when shaping the cups puts stress on the metal. Therefore, the cups are then annealed. Annealing is a process of heating the object until it is glowing hot and maintaining the temperature for a while and then rapidly cooling it by quenching in water (a previous version of this post incorrectly mentioned "letting it cool back slowly to room temperature in a room with no breeze blowing". Brass can be annealed by cooling rapidly with no ill effects. Steel, on the other hand, has to be annealed by letting it cool slowly. Cooling steel rapidly hardens it instead of softening it, whereas brass can be cooled rapidly.) The process of annealing softens the metal and removes the internal stresses caused by the shaping process. After annealing, the cups are then pickled in sulfuric acid to clean them. They are then forced through the drawing machine again to increase the length of the cartridge case (as shown in step 3 in the image below). The process of annealing, cleaning in acid and then forcing through the drawing machine is repeated multiple times, depending on the type of cartridge case, and the cartridge case is elongated each time until it reaches the size as shown in step 4 of the image below.

Public domain image.

Then the neck is formed by pushing the cartridge case through a press to give it the bottle-necked shape, as shown in step 5 in the image above. The base of the cartridge and the rim are formed by a powerful horizontal punching machine, which forces the empty case into a die to form the base and the cap chamber, as shown in step 5 and 6 in the image above. Finally, two tiny holes ("flash holes") are pierced through the cap chamber, as shown in step 6.

The cartridge cases are then trimmed to the required length and the rims are machined to remove sharp edges  and then, a primer cap is applied to the base of each case by a descending rammer and they are ready for loading. We will study exactly how this was done in the next post.

These days, many cartridge manufacturers use an extrusion process to form the cartridge cases, as it is faster and  more economical (we will study that shortly). However, there are a few manufacturers around, such as Norma, Lapua and RWS, that still use the traditional process to make premium quality brass cases.


Wednesday, March 25, 2015

What is Keyholing?

When a person fires a rifled weapon towards a paper target, the usual result expected is that a round hole corresponding to the diameter of the bullet will appear on the target. However, sometimes a larger hole appears, often the hole may appear longer in one direction than the other, such as shown in the image below:

An example of keyholing. Click on the image to enlarge.

These larger holes sometimes resemble a keyhole and therefore, the effect is called keyholing. We will study the causes of keyholing in today's post.

By looking at the shapes of some of the holes in the above target, the reader may notice that some of those holes look distinctly like the shape of a bullet going through the target sideways. In fact, this is exactly what has happened.

Under normal working conditions, the rifling of the barrel imparts a spin on the bullet, which stabilizes it in the air and makes it travel with the nose pointed forward always. However, if the bullet is not stabilized properly when it comes out of the barrel, it will wobble in the air or repeatedly tumble over itself while traveling to the target. Thus, when it strikes the target, it may not strike it with the nose precisely pointed forward and will therefore leave a larger hole.


In the above image, we see three holes. Observe that all three holes are somewhat larger than the diameter of the bullet. The top most hole is shaped like an oblong and was caused by a bullet not flying straight when it impacted the target. The middle hole is more round, but still has a pointed hole on one end showing that the bullet was wobbling in the air when it hit the target. The bottom hole clearly shows that the bullet was toppling end over end and hit the target sideways.

So what causes the bullet instability through the air? There are several causes for this:

  1. Rifling in the barrel could be worn out, therefore it does not impart enough spin to the bullet while it is leaving the barrel. 
  2. The bullet might be undersized and is therefore not engaging the rifling properly.
  3. The rifling twist rate may not be adequate for the weight, shape and profile of the bullet. For example, the M855 cartridge and the L110 cartridge are both designed for the M16A2. The bullet from a M855 (or SS109) cartridge can be adequately.stabilized by a barrel with a 1 in 9 twist rate (i.e.) 1 turn every 9 inches (228.6 mm.) of barrel length. On the other hand, the bullet from the L110 tracer round cartridge does not adequately stabilize at this twist rate and needs a twist rate of at least 1 in 7 (i.e. 1 turn every 7 inches (180 mm.)) for the tracer bullet to stabilize. This is because while the bullet diameters are the same, the weight,  distribution of mass throughout the bullet and the bullet profile shapes are different, which causes the instability. Therefore, M16A2 rifles come with a 1 in 7 twist rate barrel, so that they can be used with both bullet types.
  4. Leading in the barrel could also cause the bullets to not spin as much when they come out of the barrel.
  5. Damage to the barrel near the muzzle may cause the bullets to wobble or tumble as they come out.
  6. The bullet does not always immediately stabilize in the air as it leaves the barrel and needs to travel a little distance in the air before it gains stability. If the target is too close, the bullet may be still wobbling in the air a bit, by the time it hits the target.
  7. The bullet may have hit something on the way to the target, causing it to tumble in the air for the rest of its journey.
An unstable bullet is undesirable because it flies unpredictably in the air and therefore affects the accuracy of the firearm. An unstable bullet also loses velocity faster and it may not transfer as much energy to the target when it strikes it. 

Keyholing is a sign that the bullets are not being stabilized properly. If a gun shoots maybe one keyhole in 500 shots, it may just be due to a bad bullet, but if it regularly shoots keyholes, then that means there is a problem with the barrel or bullets or both, which needs to be fixed.


Sunday, March 22, 2015

Terminology: Flash in the Pan

In English, the expression "flash in the pan" generally means something that starts off very strongly in the beginning, but fails to deliver a result. The origin of this term actually has to do with firearms. You see, back in the early days of muzzle-loading firearms, such as matchlocks, wheel-locks, snaplocks and flintlocks, the main charge of gunpowder was filled in the barrel, but a second smaller charge of finely ground gunpowder (called the "priming powder") was placed in a small pan on the outside of the barrel, called the "priming pan" or the "flash pan". A small hole (called the "touch hole") connected the flash pan to the inside of the barrel.

A flintlock mechanism. Click on the image to enlarge. Public domain image.

 A matchlock mechanism. Click on the image to enlarge. Public domain image.
In the above image, B is the flash pan with the touch hole leading to the inside of the barrel.

To discharge the firearm, the user would typically ignite the priming powder in the pan by applying some method of ignition (whether a lit match, or sparks from a flint striking steel, or whatever). The priming powder lights up in a bright flame and the flame travels though the touch hole and ignites the main charge of gunpowder that is in the barrel, which discharges the firearm and sends the bullet towards the target.

Well, this is how the process is supposed to work in theory, but it didn't always happen this way. Sometimes, the priming powder would ignite with a bright flame, but the gun would fail to fire. This could happen for a few reasons:

  1. The touch hole was blocked by soot and dirt.
  2. The flame from the pan didn't travel through the touch hole to ignite the main charge.
  3. The inside of the barrel was wet and the main charge of powder didn't light.
  4. The user forgot to put the main gunpowder charge in the barrel or didn't load it properly and only loaded the flash pan.
In such situations, the user would see a bright flame and a lot of smoke coming from the flash pan, but after that, nothing would happen.


In the video above, the person deliberately creates a "flash in the pan" effect with his flintlock musket, by only loading the flash pan, but not loading the main charge of gunpowder. As you can see, there is a very bright flame in the beginning, but after that nothing happens.

So there you have it: a flash in the pan is a very flashy start, but with a disappointing result at the end.

Saturday, March 7, 2015

Terminology: Lock and Load

The term "lock and load" is often seen in war movies, especially in scenes with firearms, where a sergeant gives the command to "lock and load" to the troops under him. So what does this phrase mean and what is the origin of it?

The command "lock and load" means to prepare the firearm for firing and put it in condition 1 (i.e.) a loaded magazine is inserted, there is a round in the chamber and the weapon is cocked, but the safety devices are enabled.

So, should the term be "load and lock" or "lock and load" then? Well, it appears that the reason "lock and load" entered into military jargon is because of the M1 Garand rifle.

M1 Garand rifle. Click on the image to enlarge. Public domain image.

In the M1 Garand, to load the weapon, the user first pulls the bolt back and locks it to the rear, and enables the safety in front of the trigger guard. If the bolt is not locked to the rear, it may slam back shut. Once the bolt is safely locked back and the safety is enabled, an en-bloc clip containing 8 cartridges is loaded into the magazine through the top.

Loading a M1 Garand. Public domain image.


When the clip is pushed in, the bolt snaps forward on its own (and if the user is not careful, it may slam into his/her thumb. A common injury among US military personnel was the "M1 thumb"). Once the bolt slams forward, it strips the top cartridge from the clip and the weapon is now loaded. This completes the "lock and load" procedure. The user only needs to disengage the safety and the weapon is ready to fire.

The first time this phrase appeared in a movie was in "Sands of Iwo Jima" starring John Wayne. Since then, the phrase has appeared in many movies (e.g. Saving Private Ryan, Full Metal Jacket etc.) and has become well known in popular culture. It is still used even when the weapon in question is not a M1 Garand. For example, in a M-16, on hearing the command "lock and load", a user pulls back the charging handle and locks the bolt in place, enables the safety, inserts a magazine into the rifle and then pushes the bolt release button to close the bolt.

So why does the procedure enable safeties during the lock phase and before the loading phase. Well, this is because the US military develops its procedures to accommodate all sorts of soldiers, including those who may never have handled a firearm before. As they say, it is better to be safe now than sorry later.


Thursday, March 5, 2015

What is a brass catcher?

Today's post will be on the topic of brass catchers, otherwise called shell catchers. What is a brass catcher and what does it do for the user?

A brass catcher is a device to collect the fired cartridge cases. They come in many shapes and sizes and price ranges. Cheap ones can be found for about $8.50 or so, and expensive ones can cost around $80.00 or so. The images below show some brass catchers:


Click on the images to enlarge. Public domain images.

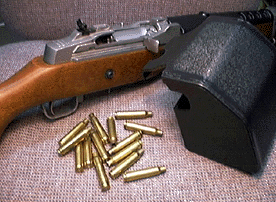
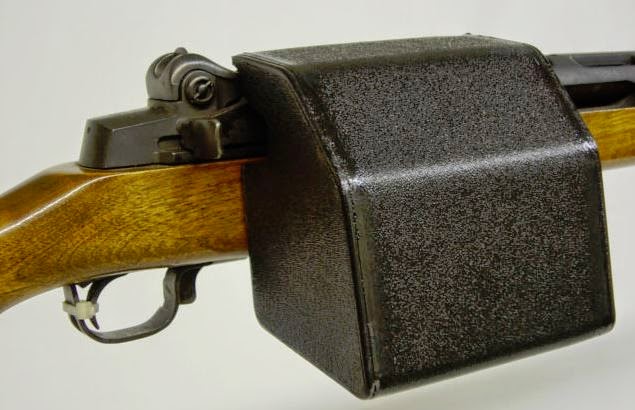
As you can see by the above images, they come in different shapes and sizes and are made of different materials. The first one is a mesh bag with an attachment that allows it to be hooked to the picatinny rail on top of the AR rifle. The second one is a metallic net shaped into a cylinder, that is attached to the ejection port on the gentleman's rifle. The third and fourth pictures show a plastic one that attaches to a Ruger Mini 14. Some more expensive shell catchers don't need to be attached to a firearm and come with their own frame and stand and can be positioned on the side of the shooter.

When the user pulls the trigger, the firearm shoots a cartridge and then the ejected case comes flying out of the port. If a brass catcher is attached to the ejection port, the cartridge case falls into it and the brass catcher can be detached and emptied later. If the brass catcher is attached properly, it does not interfere with the functioning of the firearm.

So what is the purpose of a brass catcher then? Well, they are pretty handy to have in a shooting range for a number of reasons:

First, while shooting is a lot of fun, a user still has to clean up the ejected cases afterwards. After all, responsible people don't want to damage the environment and leave their trash lying around. If these cases are collected automatically, cleaning up becomes a much quicker job.

Second, some firearms can eject spent cartridge cases quite far away (like 10-15 feet (3-4 meters) or so). If a range has multiple people at the firing line simultaneously and there are no panels in between the shooters, the hot cartridge cases from one user's firearm can end up getting ejected on to the next shooter's face or body parts, thereby disrupting their concentration and creating an unsafe situation. With a shell catcher attached to the firearm, the hot cases will not fly out and hit the next person in line.

Third, if the floor of the firing range is made of a hard substance, such as concrete or rock, then ejected cartridge cases may hit this hard surface and get dented, dinged and otherwise damaged. For people who like to reload ammunition, damaged cartridge cases cannot be re-used. Cases can also roll off somewhere and get lost. With the prices of brass and ammunition being more expensive these days, reloading cartridges is one way for shooters to cut down their costs, especially those who like to shoot large volumes of ammunition. Investing in a cheap shell catcher suddenly becomes worthwhile, as it quickly recoups its cost with the number of cases that it saves.

Of course, there is a caveat to using shell catchers as well. A shell catcher can alter the balance of a weapon somewhat (at least, for those models that attach to firearms), especially as it starts to fill up with empty cartridge cases. For this reason, it is considered good practice to empty the shell catcher periodically after every magazine or two.