Showing posts with label paper cartridge. Show all posts

Sunday, November 22, 2015

Early Cartridge Technologies: Linen Cartridges

A few weeks ago, we began to study an early form of cartridge: the paper cartridge. Where we left off, paper cartridges had advanced to the point where the paper was treated with chemicals to make it more combustible.

The main problems with paper cartridges are that they aren't very water resistant and the paper is somewhat fragile. As the bullet could be rather heavy, the weight of the bullet could cause the paper to tear as well. There was a need for a cartridge to be made of a more durable material and that's when the linen cartridge was born.

A .52 caliber linen cartridge for a Sharps rifle. Click on the image to enlarge.

In 1852, American inventor Christian Sharps invented a linen cartridge, to go with his Sharps rifle (which was earlier invented in 1848). The linen cartridge was a great improvement over the paper cartridge because it could withstand rough handling better, without breaking open. A linen cartridge also held its shape better than a paper cartridge could. The back of the linen cartridge had a piece of nitrated flash paper (which we studied in the last post) to provide the ignition. The linen used to make the cartridge body was treated with starch to make it stiffer. Linen cartridges were also treated with chemicals to make the linen more combustible, similar to that of paper cartridges that we studied earlier. Like the paper cartridges, the bullet was glued on top with sodium silicate glue.

For a while, cartridges were made for the Sharps rifle with both paper and linen, but the linen cartridge gradually started to find some backers. In the words of a Major W.A. Thornton:

"The making of Sharps Cartridges with paper must be abandoned and linen must be used in the formation of the cylinder. More care cannot be given in the making of cartridges than is bestowed in our laboratory. The fact is that the ball is too heavy for the paper, and worse than that -- the paper is sometimes softened by the lubric which causes it to break by the weight of the ball. From this date, I will make no more of paper, but I will make the powder cylinder of linen."

What the Major is describing are two flaws of the paper cartridges used by the Sharps rifles. The first is that the weight of the bullet is so great that a paper cartridge cannot hold its shape and often tears open by itself, due to the weight of the bullet. The second problem is that the lubricant (spelled in his letter as "lubric") also softens the paper and weakens it, thereby causing the paper to break. Since the lubricant is necessary to reduce the fouling inside the barrel, a stronger material must be used for the case body and this is why linen was used.

Linen cartridges were used by both the Sharps rifle and the Starr carbine during the Civil War.

In our next post, we will study another durable material that was also used to make cartridges during that period of time.


Saturday, November 14, 2015

Early Cartridge Technologies: Paper Cartridges - III

In our last post, we saw the advances in paper cartridge technology to handle expanding bullets. In today's post, we will study more advances in paper cartridge technology around the time that percussion caps and revolvers started becoming popular.

Early Colt Paterson revolvers. Click on the image to enlarge. Public domain image.

With the advent of percussion cap revolvers, such as the Colt Paterson models pictured above, most people loaded their revolvers from paper cartridges exclusively. The paper cartridges were therefore modified a bit to take advantage of these new developments in firearms.

In the picture above, note that the two Colt Paterson 1839 model revolvers have a loading lever under the barrel, whereas the 1836 model doesn't have this feature. We will see how that is used with the cartridges that we will study today.


Paper cartridges for a .36 caliber Colt revolver.; Click on the image to enlarge

As you can see in the images above, the bullet is now in the front of the cartridge (unlike the designs we studied in our last post). The bullet is attached to the cartridge with glue. Also, the shape of the cartridge has changed a bit, so that the paper part now forms a conical shape instead of a cylindrical shape. This was a deliberate design choice, so that it is easier for the user to insert the cartridge into the front of the cylinder. Unlike previous designs, there is no need to tear the paper and pour the powder into the chamber. Instead, the loading lever is used to ram the entire cartridge into the chamber. Because of the shape of the cartridge, the cartridge paper automatically tears open when it is compressed into the chamber. Some cartridges were equipped with a protective outer layer around the cartridge, to keep it safe from moisture, and these would have a tiny tear tab to remove the outer layer before loading the cartridge.

A glue made of sodium silicate was used by the Colt Manufacturing Company to hold the bullet to the cartridge, as well as seal the paper part. This was what was used by Colt between 1851 to 1873, until they started to produce brass cartridges in 1873. Sodium silicate has the advantages of resisting high temperatures, as well as being cheap and easily available. Sodium silicate was also used to cement the top wad of shotgun shells and was heavily used by American farmers who reloaded their own shells in the 1870s, as sodium silicate was the same material used to preserve eggs as well.

One more innovation made to these cartridges was to the paper material as well. In order to make the ignition of the powder more reliable, the paper was treated with chemicals to make it burn better. This paper is called nitrated paper, as it is manufactured by soaking it in a solution of potassium nitrate and then drying it. This treatment makes the paper much more flammable than ordinary paper. Such cartridges are called combustible cartridges, because the paper burns almost completely upon ignition. A properly nitrated paper leaves behind less ash and residue, thereby making it easier to clean and reload the weapon.

Another formula for making combustible paper used a solution of nitric and sulfuric acids and was used by both Colt Manufacturing and Dow Chemicals, as well as some other manufacturers in the 1800s. These are essentially the same chemicals used to produce guncotton, which we had studied a few years before. Paper that is treated this way is called flash paper. This paper also burns quickly and leaves very little ash behind, but it is much more unstable than nitrated paper, and in the early days, it was also prone to spontaneous combustion. This is why flash paper did not gain much popularity in the firearms industry. These days, the only people using flash paper are magicians, who use it to produce spectacular flames when performing magic tricks.

With the advent of metallic cartridge technologies, the use of paper cartridges started to reduce. However, there are still some applications for which paper is used. For instance, until about 1960 or so, many shotgun shells were made of paper bodies, with a brass base and rim. The reason for this was because it was cheaper and easier to make the body out of paper than to make the entire shotgun shell out of brass. Around 1960, shotgun shells started to use plastic bodies instead of paper, and a majority of modern shotshells today make use of plastic. Nevertheless, it is still possible to buy paper shotshells even today.


The bodies of these cartridges are made of a cardboard paper and are coated with wax to provide some resistance to moisture. They aren't as common as they were back before 1960, but there are still some manufacturers making them.


Saturday, November 7, 2015

Early Cartridge Technologies: Paper Cartridges - II

In our last post, we looked at the earliest forms of paper cartridges. In today's post, we will look at more developments in that field.

As firearms technologies improved, smoothbore muskets began to be replaced by rifled barrels for greater accuracy. The invention of expanding bullets, such as the Minie bullet, made it possible for firearms to not only shoot accurately, but also improved the gas seal without the need for thicker wadding, because the bullet would expand and produce the gas seal itself. The main problems to solve here were to reduce the amount of fouling produced by the black powder and lead from the bullet, as well as to keep the cartridges from being affected by bad weather. The solution to both these issues was to provide a coating to the paper cartridge case, in the form of a mixture of beeswax and tallow. This coating allowed the cartridge to be somewhat water resistant, as well as provided lubrication to the bullet.

The lubricant made it easier to push the bullet down the barrel of the muzzle loader and also softened the residue inside the barrel, so that most of it could be pushed out of the way easily when reloading. This helped reduce the problem of powder fouling in the barrel, though it did not solve it.

Since the bullet expanded and provided the tight seal on firing, the paper needed to be thinner than previous paper cartridges, so it could fit between the bullet and the barrel properly. However, the thin paper could cause the body of the cartridge to not be sturdy enough. To get around this problem, cartridges were often made using multiple layers of paper, some thick and others thin. The following instructions and illustrations are taken from an instruction manual dating back to 1853 for the Enfield rifle. The manual explains that soldiers might find themselves in the position of having to make their own cartridges in the field, and therefore the manual shows how this was done.

Three separate papers used to manufacture an Enfield cartridge. Public domain image. 

Tools used to manufacture the Enfield cartridge. Public domain image.


The first image shows the different paper shapes used to make a single cartridge, along with their sizes. The paper shape on the right (labelled as "stiff paper") is made of a thicker paper material and forms the body of the cartridge and gives it the strength, so that the cartridge does not deform easily. The paper shape in the middle (labelled "inner envelope") is made of a thinner paper material. It wraps in a thin tube around the thicker paper and then blocks it on one end, thereby separating the powder from the bullet. The third piece of paper on the left (the "outer pattern") is also made of a thinner paper material. It wraps around the bullet and the other two tubes, thereby enclosing the bullet and powder in one packet.

To manufacture one of these cartridges, the instructions are as follows:
  1. Make the powder case: This is done by rolling the "stiff paper" pattern tightly around the mandrel around 2.5 times. The mandrel is laid opposite to the side AB, with the base of the mandrel head coinciding with AD. After the "stiff paper" is rolled around the mandrel, the "inner envelope" paper is placed on top of it and rolled around it. The second paper overlaps the first one, so the excess is pushed into the hollow at the base of the mandrel, making use of the point to adapt the paper to the cavity which is to receive the point of the bullet, being careful to secure the bottom of the powder case, so that no powder can escape from it.
  2. Attach the bullet to the powder case: Put the point of the bullet well into the cavity of the powder case. Then roll the "outer envelope" paper tightly around the bullet and powder case, with the mandrel still in it. Then twist or fold the overlapped paper as close as possible to the base of the bullet. Then place the base of the cartridge on the table and withdraw the mandrel carefully from the other end, by pressing the powder case with one hand, while pulling the mandrel with the other, the aim being to not separate the powder case from the bullet. The powder case must be kept as close to the bullet as possible, otherwise the cartridge will not be usable.
  3. Charge the cartridge case: Place a funnel at the mouth of the cartridge case and pour in about 2.5 drams of black powder, or a lesser quantity, according to the firearm used. Remove the funnel, being careful that none of the powder escapes between the inner and outer envelopes and then secure the charge by squeezing the tops of the two envelopes close to the top of the stiff paper of the powder case, and then giving them a slight twist with inward pressure, laying the ends on the side of the cartridge. Three slits are made in the outer envelope to facilitate its detachment when fired.
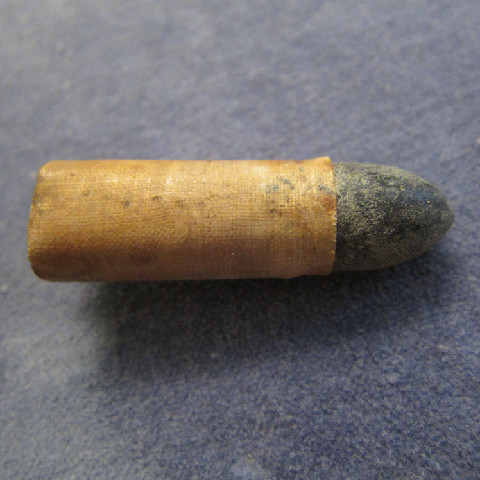
The next picture is in color and shows how these three papers combine together in a complete cartridge:

Internals of an Enfield cartridge from the 1850s. Click on the image to enlarge.
Public domain image courtesy of user Zerodamage at Wikipedia/
  1. Lubricate the cartridge: In this step, the base of the cartridge case is dipped up to the shoulder of the bullet, into a lubricating mixture composed of 5 parts of beeswax and 1 part of tallow.
A complete Enfield paper cartridge. Public domain image.


Cartridges were then packed in bundles of ten, and each packet was labelled as shown below.

The second line indicates that these cartridges are for the Enfield model 1853 rifle musket. The next line indicates that the bullet is of .55 inches in diameter. The word "wax" is to indicate the composition of the lubricant and the three horizontal lines after that indicate that the outer paper layer has the three cuts (as detailed in step 3). The next line indicates how much black powder is in each cartridge (2.5 drams) and the last line indicates that each bullet has a plug made of wood in its base and this plug enables the bullet to expand when the cartridge is fired.

The packets were then tied together with strong twine and packed into barrels, by placing the packets around the sides of the barrel, with a cylinder of percussion caps being placed in the center, with the ratio of 75 percussion caps for every 60 cartridges in the barrel.

To load such a cartridge into a rifle, the powder end of the cartridge is opened by tearing the thin outer paper envelope and the powder is then poured into the muzzle of the rifle. Then the bullet end is inserted into the muzzle, up to the level of the thick paper tube, which is then torn off and discarded. The bullet and the remains of the thin outer envelope are then pushed into the barrel using the ramrod and the rifle is then cocked and prepared for firing.

Interestingly, the use of lubricated paper cartridges was one of the causes of the Great Indian Mutiny of 1857. The sepoy soldiers of British India were required to bite on the cartridges to open them, as part of the loading procedure. A rumor spread that the cartridges were greased with beef fat (offensive to Hindus, who are forbidden to eat beef) and pig fat (offensive to Muslims, forbidden to eat pork). There were already rumors that the British authorities were trying to destroy the religions of the Indian people and the rumors of the content of the cartridge grease convinced sepoys of the Bengal regiment that their fears were justified. This was cited as one of the causes for the mutiny to start.

In our next article, we will look at further improvements to the paper cartridge, as we enter into the era of revolvers.


Wednesday, November 4, 2015

Early Cartridge Technologies: Paper Cartridges - I

Since we were discussing cartridge rim types in our recent series of posts, your humble editor decided to go back in time to the first cartridges. We had already discussed paper cartridges some time back when this blog first started, but it might be nice to revisit that topic in detail.

A paper cartridge is simply a cylinder or conical shaped object made of paper and filled with a bullet, some black powder and sometimes, a lubricating substance (such as wax or lard). The paper was often of a thicker type. In later years, a special type of paper, called cartridge paper, was specially developed for this purpose. From a firearms perspective, one of the biggest advantages of paper cartridges was that it allowed the users to reload their firearms quicker than before.

According to W.W. Greener's book, The Gun and its Development, the use of paper cartridges has been going on for a while. It was stated that the soldiers of Christian I, Elector of Saxony (currently in modern Germany), were using paper cartridges in 1586. Interestingly, Christian I of Saxony was from the House of Wettin, some of whose descendants are the Royal family of the UK. Greener also states that in the Dresden museum, there are Patronenstocke and other evidence to show that cartridges were in use, as early as 1591 (since the book was written in the early 1900s and Dresden was bombed heavily in World War II, your humble editor is not certain if the specimens still exist there). Finally, an author named Capo Bianco wrote in 1597, that cartridges had long been in use among Neapolitan soldiers. In England, the British Patent office has a record from 1777, when one William Rawle patented several "instruments for carrying soldiers' cartridges". Therefore, we can see that paper cartridges have been in use for quite a while.

A typical paper cartridge. Public domain image.

As we studied a long time ago, most of the early firearms were muzzle-loading, with no rifling at all. Early cartridges for such weapons simply consisted of a paper tube with three pieces of thread: two threads tied on each end to seal the packet and a third thread somewhere in the middle to divide the paper tube into two compartments, such as the one in the image above.

The first compartment (the smaller one) contained the bullet (or bullets), which were spherical shaped because the muskets didn't have rifling. The second compartment (the larger compartment) contained a pre-measured quantity of black powder.

To load the musket, the user would use the following process:

  1. Hold the musket level and open the cover of the flash pan.
  2. Bite open the cartridge on the side containing the powder and pour a small quantity of the powder into the flash pan to prime it. Then close the cover of the flash pan.
  3. Turn the musket up vertically and pour the remaining powder into the barrel.
  4. Crumple up the paper and insert the ball and paper into the muzzle of the musket.
  5. Use the ramrod to push the ball and paper down the barrel of the musket.
  6. Prepare the musket for firing by cocking the flintlock mechanism.
Since the quantity of black powder in the cartridge is already measured in advance, this eliminates the  need for the user to measure the proper amount of powder during reloading. Also, since the bullet ball is already wrapped in the packet, the user doesn't need to search around in a separate bag to find a ball for reloading. As smoothbore muskets of the era were loaded with lead balls that were smaller than the diameter of the barrel, the cartridge paper also served as a patch to provide a good gas seal in the barrel.

Paper cartridges of this early type were generally designed with thicker paper, so that they could withstand rough handling.

It must be mentioned that black powder leaves a lot of residue in the barrel, therefore it becomes harder to push the ball in after every shot, until the barrel is properly cleaned. Also, black powder does not like damp conditions very much.

In the next part, we will look at some developments in paper cartridge technology that solved some of these problems, as well as handling newer firearm technologies, such as rifling.


Sunday, May 2, 2010

Cartridges: Needle Gun Cartridge

As we've seen in our previous discussion about paper cartridges, these were mainly used with muzzle-loader weapons. We've also studied percussion lock mechanisms, where ignition of the gunpowder is achieved by using a percussion sensitive primer (e.g. mercury fulminate or potassium chlorate) to set off the main gunpowder charge. Instead of using a separate percussion cap to do this, the next logical development in cartridge technology was to include the percussion cap as part of the cartridge. This way, the user can quickly reload the weapon simply by opening the weapon at the breech end, dropping in a new cartridge and then closing the breech and cocking the weapon. These cartridges were also instrumental in making breech-loader weapons start to replace the older muzzle-loader weapons.

The Prussian Dreyse Needle gun followed by the French Chassepot rifle were among the first mass-produced military weapons that used breech-loader technology. The cartridge that went with them was still made of paper at this point, but it had some interesting features:

Public domain image courtesy of wikipedia.com
It consists of a paper cartridge that contains an oval shaped bullet glued to one end. The other end is filled with a charge of black powder. Towards the middle is a percussion cap C, which contains a shock-sensitive primer (potassium chlorate or mercury fulminate). When the weapon is fired, a sharp needle held by a spring is forced into the cartridge and makes its way through the gunpowder until it contacts the percussion cap. Due to the force of the needle striking the percussion cap, it deforms and detonates the primer. The primer then ignites the main charge, which then forces the bullet out of the barrel.


What is interesting about this cartridge is that the percussion cap is inside the middle of the cartridge and attached to the bullet. This means that the powder burns backwards towards the base of the bullet. In modern cartridges, the primer is usually placed at the end of the cartridge and hence, as the gunpowder is burning, the gunpowder closer to the bullet sometimes gets blown out of the barrel along with the bullet and some of the flash occurs outside the rifle. With the needle gun cartridge, the primer is in the middle and so the gunpowder burns towards the base of the cartridge and thereby burns all of the powder. In fact, since the cartridge was made of paper, the paper was almost completely burned as well and needle guns didn't need to clear the old cartridge case when loading a new one. Additionally, since the primer cap was attached to the bullet, it would be ejected along with the bullet. Due to the fact of the powder being burned completely, needle-gun cartridges often needed less powder than modern cartridges to propel a bullet to the same velocity. Also putting the primer in the middle of the cartridge made it harder to detonate the cartridge by accident.

When breech-loading needle guns were introduced around 1835, they were a massive improvement over muzzle-loaders in that the loading time was significantly reduced. A soldier using a Dreyse Needle Gun could reload 5 times before an opponent using the latest muzzle-loaders of that time and could do this from a prone position. This gave the Prussians a massive advantage over the Austrians. The French were not long behind making a needle-gun of their own. The needle-gun was the first widely adopted military breech-loading weapon, and was responsible for making muzzle-loaders obsolete from the military scene.

So why did the needle gun cartridges eventually get replaced by more modern cartridges? Well, one of the weaknesses of the needle gun cartridges was the firing mechanism. The needles were thin and delicate and broke often. As a result, soldiers needed to carry spare needles with them on the field. Also, the sealing mechanism on the breech wasn't always tight and sometimes the gas would escape from there and burn the soldier's cheek. Better options were invented for breech-loaders and the needle-gun and its cartridges faded into history by the 1880s or so.

Cartridges: The Paper Cartridge

With the spread of muzzleloader weapons, it became necessary to speed up the process of reloading a weapon. First, here's the whole reloading process that needed to be done without using paper cartridges (note the text marked in bold font):


  1. The user first enables the weapon's safety mechanism so that it cannot go off when loading. In the case of a flintlock, the user puts the mechanism at half cock and pushes the safety lever. In the case of a matchlock, the user makes sure the lit match is kept well away from gunpowder.

  2. The user places the butt of the gun on the ground, taking care that the barrel is pointed away from the user.

  3. The user takes their powder from their powder horn (a conical container hanging from the waist that contains gunpowder) and pours out a certain amount of gunpowder into a measuring tube or measuring flask.

  4. The user then closes the powder horn and returns to their waist. The user then pours the powder from the measuring tube into the top of the muzzle (or barrel). The user also taps the barrel a bit to make sure the powder has settled in the bottom of the barrel near the pan.

  5. The user then takes a bullet (in those days, it was a ball) and wraps it in a patch of lubricated paper or cloth to surround the bullet. Since the diameter of the bullet is usually smaller than the barrel, the patch surrounding it ensures a tighter fit.

  6. The user then pulls out the ramrod which is a long thin rod stored under the barrel and uses it to push the bullet all the way into the barrel, so it is sitting on top of the gunpowder. The user then returns the ramrod to its storage tube under the muzzle.

  7. The user now lifts the weapon off the ground and opens the cover over the pan (called the frizzen for flintlocks and pan cover for matchlocks and wheel-locks). The user then adds some priming gunpowder into the pan and closes it. In the early days of firearms, the priming gunpowder was finer than the main gunpowder in the barrel.

  8. The user then cocks the rifle to full cock and disables the safety mechanism. Now the weapon is ready to fire.


One solution to speed this process up (especially the sections marked in bold font above) is to provide pre-measured quantities of gunpowder and priming powder in a handy packet, so that the user doesn't have to measure them out in the field. This was what the first cartridges did and they were made of cloth or paper. Soon after, it was realized that it would be faster still, if the packet also contained the bullet inside it, so that the user wouldn't have to fumble around for a bullet in a separate container. Better still, it was realized that the material that the packet was made of could also be used as a patch or wadding, which reduced one more overall step as well, since the user didn't have to fumble around for a separate patch. By this time, paper was usually the material of choice for making the cartridges. The next step was to coat the paper on the outside with wax or tallow. This made the paper cartridge somewhat resistant to water and also had a secondary function -- on firing the weapon, the wax would melt and combine with the gunpowder residue, making it easier to clean the barrel later.

Typical paper cartridges for muzzle-loaders were made as a paper tube which was divided into two sections and then sealed off on both ends. The first section contains the bullet and the second section contains the gunpowder. Thus, for a muzzleloader with paper cartridges, the loading process was now reduced to:

  1. Hold the weapon horizontally and open the flash pan.

  2. Bite the end of the cartridge that contains gunpowder to open the packet. Then pour a little bit of powder in the pan and close the pan cover.

  3. Hold the weapon vertical and pour the rest of the gunpowder into the barrel.

  4. Now take the other end of the cartridge (the end that contains the bullet) and ram it into the the barrel using the ramrod. There is no need to wrap the bullet in a patch or wadding since the paper of the cartridge already serves this function.

  5. Cock the rifle and it is ready to fire.


Compared to the old loading process, the number of steps to load the weapon is reduced significantly.

For percussion lock muzzle-loading weapons, the procedure is similar:

  1. Hold the weapon vertically.

  2. Tear open the powder end of the cartridge and pour into the barrel.

  3. Put the other end of the cartridge (the end containing the bullet) on top of the barrel and ram it inside using the ramrod.

  4. Bring the weapon horizontally, put it on half cock. Reach into a separate bag that contains percussion caps and place a percussion cap on the nipple of the weapon

  5. Bring the weapon to full cock and it is now ready to fire.


Later on, an early breech-loading weapon invented in Germany, called the Dreyse Needle Gun took the percussion lock idea one step further and included the percussion cap into the cartridge itself. To use this, the user would simply open the breech of the weapon, drop in the cartridge and then cock the weapon. Paper cartridges were slowly phased out when breech-loading weapons became increasingly popular, and they were replaced with metallic cartridges.

Incidentally, one of the causes for the Great Indian Mutiny of 1857 was due to a rumor that the tallow that the paper cartridges were coated with on the outside, was made with cow-fat and pig-fat. Since the soldiers were required to bite these cartridges to open them, as part of the loading procedure, they believed that this was a plot against their religions. To counter this rumor, some garrisons allowed the soldiers to grease their own cartridges, but it wasn't enough to prevent the mutiny from starting. After peace was restored, all units were allowed to grease their own cartridges themselves.